Quarter 1 Assessment, 10 pts, Due 10/30*
This is a "whatever you want" project, but with a few guidelines. I want you to use the skills we have learned to date, in one project of your own design. You can refer to the tutorials we have used, and projects we have done, for reference. There is no one way this project should look. I must see that you have used certain tools.
Step 1:
Choose a picture you have taken. You can use Thursday to take pictures.
Step 2:
Do stuff to the picture in Photoshop AND Illustrator. That's right! You have to use BOTH! I do not care which one you start with. You CAN add images from the internet. I will be happy to scan a drawing if you need me to.
I need to see evidence of (you will also write a short paragraph explaining where/how you used the following tools):
|
Photoshop tools:
|
Illustrator tools:
|
*This project is due 10/31. YOU MUST WORK ON IT EVERYDAY. That is part of your grade. If you finish before end of class on 10/29, I will make you do more. You can use 10/30 and 10/31 as benchmark recovery days if you finish the assessment on 10/29.
Day of the Dead : Calaveras in Illustrator

|
We will use Illustrator to turn ourselves into Calaveras/sugar skulls.
Sugar skulls are traditionally made for the Day of the Dead. Typically, the skulls represented a departed soul. Skulls would have the name of a loved one written on the forehead and would be placed on the home ofrenda or gravestone to honor the return of a particular spirit. Step1: Use the internet to research ideas for your calavera design. Trace your face, eyes and mouth onto a piece of tracing paper. Draw an "up-side-down" heart shape for your nose. Complete the drawing (on the tracing paper) with an original calavera design. We will scan the drawings and render the designs in Illustrator. Step 2: Open a letter size document, portrait orientation, in Illustrator. Copy and paste your scanned drawing into the new Illustrator document. Lock the layer, make a new one. Use the pen tool to trace your drawing. Step 3: Open a new US Paper size document in Photoshop. Open your original "selfie" and paste the photo into the new Photoshop document. Adjust the levels to get your face whiter (skeleton-like), and use the clone stamp tool to remove your nose and eyebrows. Open your Illustrator project. Turn off layer 1. Select everything on your traced layer. Go to Edit > Copy. Go back to your selfie in Photoshop. Paste the Illustrator tracing onto your selfie, and align the two images (use the transform tool-- shift key!!!). Cut the background out from the selfie (polygonal lasso tool). Add Day of the Dead imagery to create a new back ground (flowers, candles, etc). Save as a jpg and post to weebly. |
Calavera Benchmarks (15 pts)
- smooth lines (minimum anchor points!) (5 pts)
- designs colored (1 pts)
- variety of line colors (1 pts)
- design is intricate (2 pts)
- aligned with original (1 pts)
- nose and eyebrows are removed from original photo (clone stamp) (1 pts)
- levels adjusted in original photo (to create skeleton look) (1 pts)
- original background is removed (1 pts)
- background design made of at least 5 images (2 pts)
Illustrator!
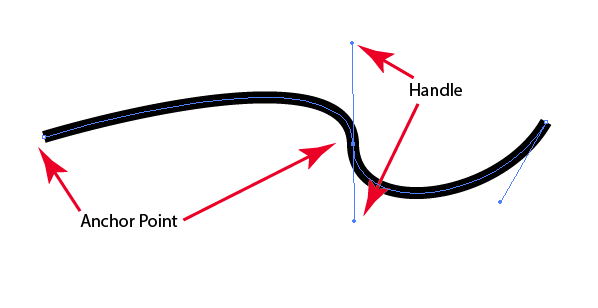
Creating successful artwork in Adobe Illustrator means learning to use the pen tool well. Below are some practice worksheets to get you started.
Stages of the Pen Tool
Be sure CAPS lock is off
|
|

|

|

|

|
About Taking Pictures

|
To the left is the CHAMP expectations for picture taking.
Weather permitting, you CAN go outside. NOTE: If you violate CHAMP expectations, you will be PROHIBITED from taking pictures outside of the classroom for the rest of the quarter. |
Alphabet Photography


|
You will be creating a 5 to 7 letter word with photographs. You will look for objects that resemble letters and take a photograph of the object. You will then apply some effects in Photoshop, crop the individual pictures and combine them into one Photoshop document.
Click > here < for inspiration Tutorial:
| ||
Demo pics for Alphabet Project


Alphabet Photography Benchmarks (10pts)
- follows guides listed above (2pts)
- desaturated / used levels (2pts)
- letters sized 2:3 ratio, portrait orientation (2pts)
- evenly spaced (2pts)
- letters not distorted (2pts)
Face Swapping and Face Folding
Face swapping is a meme where the faces of two or more people are swapped. This is an easy trick to do using Photoshop tools.

|

|
Find some good examples of face swapping here.
| ||
Face folding is another meme which basically entails removing a person's nose and moving the mouth or eyes. This is also a fairly easy trick to do in Photoshop.

|

|
Izac Less is a great face folder. Check out gifs of his face folding skills here.
| ||
Tutorials!
There are a vast amount of resources on the web in terms of ways to use Photoshop. Some of them are easier to follow than others. With a little familiarity of Photoshop, you can vastly increase your knowledge of the program with the help of tutorials.
|
Tilt Shift Tutorial:
http://photographicblog.com/how-to-tilt-shift-effect-fake-a-miniture-scene-in-Photoshop/ Choose two of your own pictures to apply this tutorial to, and post the practice picture, plus the two of your own, on weebly. See the Example Page for what your page should look like. |

|
Assignment 9/17/13Follow the tutorial for creating a focus effect in Photoshop, using the picture to the right.
When you are finished with the practice picture, choose two of your own photographs to use the tutorial on. Post the practice picture, plus the two pictures of your own on weebly. Label the pictures "Focus Tutorial 9/17" See the Example Page for an example. Focus Tutorial Link:
|

| ||
|
Assignment 9/18/13
The next tutorial teaches us how to give photographs a dream like effect.
|

| ||
Correcting Photos in Photoshop

|

|
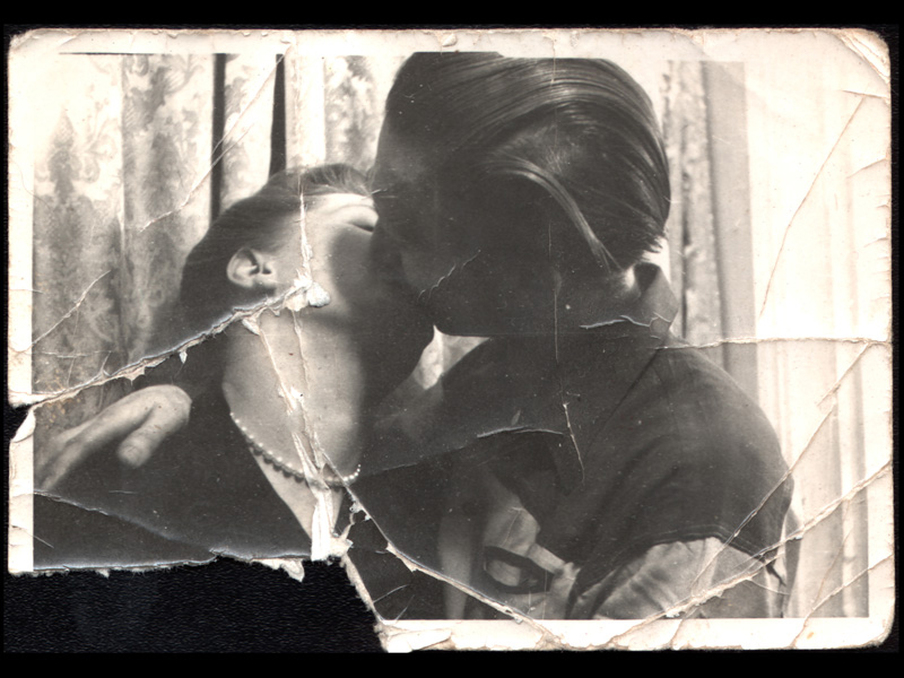
We will begin learning to use Photoshop by correcting damaged photographs.
We will using layers, the healing brush tool, the clone stamp tool, and some image adjustment functions to fix the image on the left. The image on the right will be corrected using a combination of levels, hue/saturation adjustments, and the unsharp mask. |
Photo Correction Second Demonstration:

What NOT to do:
(Click on picture for a larger view)
1. Lost detail
2. Blotchy skintones
3. Blurry edges
4. Glitchy stamp tool patterns
5. Unfinished editing
(Click on picture for a larger view)
1. Lost detail
2. Blotchy skintones
3. Blurry edges
4. Glitchy stamp tool patterns
5. Unfinished editing
Second Photoshoot 9/3/13
Viewpoint:
Before photographing your subject, take time to think about where you will shoot it from. Our viewpoint has a massive impact on the composition of our photo, and as a result it can greatly affect the message that the shot conveys. Rather than just shooting from eye level, consider photographing from high above, down at ground level, from the side, from the back, from a long way away, from very close up, and so on.
Before photographing your subject, take time to think about where you will shoot it from. Our viewpoint has a massive impact on the composition of our photo, and as a result it can greatly affect the message that the shot conveys. Rather than just shooting from eye level, consider photographing from high above, down at ground level, from the side, from the back, from a long way away, from very close up, and so on.
Lighting:
Lighting adds dramatic effect to your photographs. Usually you want the light source behind YOU when shooting photographs.
"Backlighting" occurs when the light source is in front of the lens (and behind your subject), creating dark silhouettes.
"Side-lighting" is effective in communicating strong emotion.
"Floor-lighting" is a technique of placing a single light source in front of and below the subject and the camera to create suspense and mystery.

|

|

|
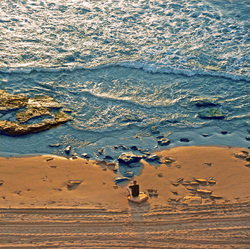
Simplify and Exclude:
The best pictures are simple and have a clear focus. When taking pictures, set up your shot so that uneccessary objects, colors, textures, etc., are not included in the picture.
Which picture below is better? Why do you think that is?
The best pictures are simple and have a clear focus. When taking pictures, set up your shot so that uneccessary objects, colors, textures, etc., are not included in the picture.
Which picture below is better? Why do you think that is?

|

|
| photosyllabus.pdf |
First Photoshoot
We will go outside and take our first series of photographs. Below are examples of composition techniques that photographers use to make sure their pictures are interesting. When you are taking pictures, try to keep these techniques in mind.
Rule of Thirds:
Imagine that your image is divided into 9 equal segments by 2 vertical and 2 horizontal lines. The rule of thirds says that you should position the most important elements in your scene along these lines, or at the points where they intersect. Doing so will add balance and interest to your photo.
Imagine that your image is divided into 9 equal segments by 2 vertical and 2 horizontal lines. The rule of thirds says that you should position the most important elements in your scene along these lines, or at the points where they intersect. Doing so will add balance and interest to your photo.


Leading Lines:
When we look at a photo our eye is naturally drawn along lines. By thinking about how you place lines in your composition, you can affect the way we view the image, pulling us into the picture, towards the subject, or on a journey "through" the scene. There are many different types of line - straight, diagonal, curvy, zigzag, radial etc - and each can be used to enhance our photo's composition.
When we look at a photo our eye is naturally drawn along lines. By thinking about how you place lines in your composition, you can affect the way we view the image, pulling us into the picture, towards the subject, or on a journey "through" the scene. There are many different types of line - straight, diagonal, curvy, zigzag, radial etc - and each can be used to enhance our photo's composition.


